Tutorials
Compress Images In PowerPoint 2013
If you need to email your PowerPoint presentation to other people, it’s important to get the file size down. The greatest factor in any presentation’s size is its media. In this tutorial we’ll show you how to compress images in PowerPoint 2013. Why not follow along with our example?
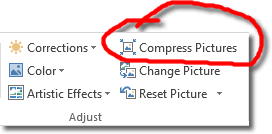
First of all insert an image onto a slide. If your image is selected, you will see the Picture Tools tab appear in the ribbon, with the Format tab within it. If your image isn’t selected, you can select it just by clicking on it.

In the Adjust group, you will see the Compress Pictures command. Click that.
The Compress Pictures window that opens offers you several options that we will go through now.
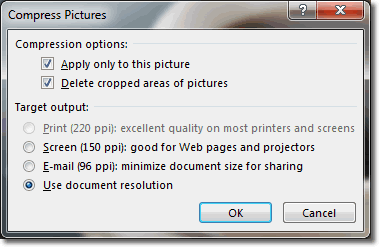
- Apply only to this picture – do you want the picture compression to apply to all images in your presentation or just the selected one?
- Delete cropped areas of pictures – check this box to discard the cropped areas of your pictures.
- Target output – you have three options here:
- Print (220ppi) – the highest pixels per inch (ppi) means the highest quality.
- Screen (150ppi) – as the ppi value reduces so does the image quality.
- Email (96ppi) – the lowest ppi value gives the smallest file size, which is better for emailing.
- Use document resolution – this is the resolution set in the Microsoft Office Backstage view. By default this is set to print or 220 ppi, but you can change this default picture resolution.
PowerPoint 2013 Compress Pictures Test
We ran a compression test by creating a presentation in PowerPoint 2013 and then inserted the Windows 7 sample pictures with one on each slide. The total file size of all the eight image was 5.56 MB. The size of the presentation before we compressed the images was 5.744 MB. After compressing the images at the different ppi settings (see above), we got the file sizes down to the following:
- Screen (150ppi) – 1.218 MB
- Email (96ppi) – 0.420 MB.
So you can see that both of the options above reduce the presentation’s file size significantly.